 Login
Login Cart
Cart


Using the Sticky Labels’ Label Designer (Real Label Design Example)

Designing professional stickers is easy with our free label designer! In fact, we’ve just overhauled the way designer works to make it the most straight-forward label designer out there!
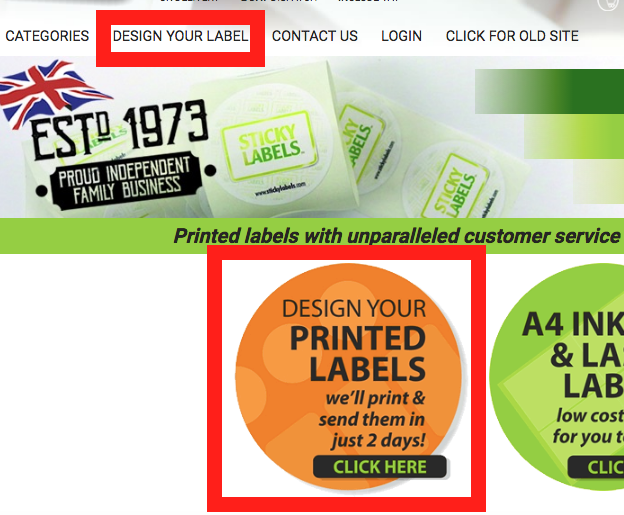
You can of course pick from our selections on the home page, the categories page of any other part of our website which will pre-populate some sections of the design engine to speed up the process, but let’s assume that you’ve come straight into the website by clicking one of the following two options highlighted in red:
From here, you’ll be taken to page one of our label designer (label builder) and the process can begin!
TOP TIP: Have a Tape Measure / Ruler Handy!
Before you get started: If you have a ruler to hand, you can see the label size before you order. Having a ruler means you can get a good idea of how the label will look and if it will be big enough or small enough for your intended purpose.
We’re sure you already have a size in mind but don’t worry, you can pick your label options and then see the available sizes once that’s done.
… Let’s create a label with that in mind!
Create Your Custom Labels: Step One
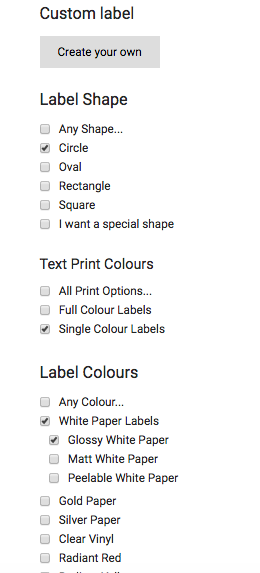
From this page, you can select from a few simple options:
- Label Shape – Circle / Oval / Rectangle / Square / Custom
- Text Print Colour – Full colour / Single Colour
- Label Colour – The background/base colour of the label
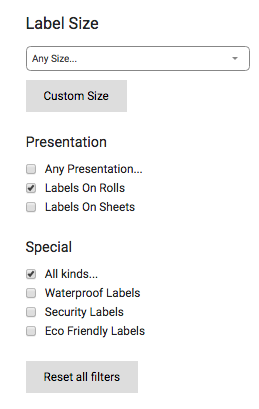
- Label Size: This differs depending on the other options you choose.
- Presentation – On rolls or sheets
- Special – Waterproof / Security / Eco-Friendly
You’ll notice that as you select from the different options on the left, you will have your “Matching Labels” displayed on the lower-right hand side of the page. The label can be clicked on to take to step two of the builder. But before we do that, let’s create a simple example label using those options….
Exactly What You Want…
Let’s say we want to produce a circular, plain white label, on glossy paper, on a roll with black text (At this stage we don’t know what size we’d like) – We’d select the following from the menu on the left:
We’d then be given the following three label options in this case, with the sizes and prices clearly displayed. Delivery is ALWAYS FREE and fast!
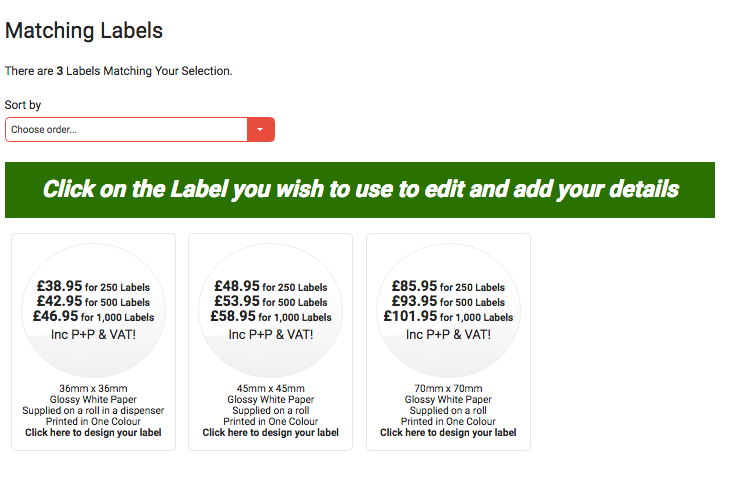
Note that we can pick the size, which is written below the “Matching Labels” that fits our criteria. Let’s say we decide to go with 70mm x 70mm and we’ll be taken to the next step…
Custom Label Designer: Step Two
With those selections made, we can start adding your details to the label you have chosen!
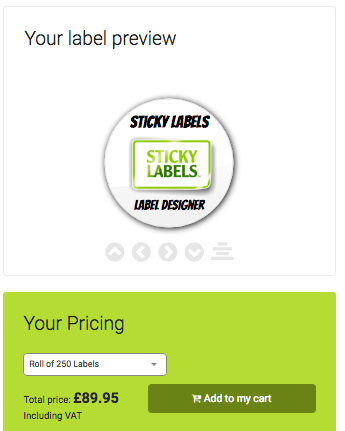
Let’s create a label as we go. Imagine we want a branded label with “Sticky Labels” text on it, our logo and “Label Designer” underneath.
By default, you will be in the “Text” section of the label designer.

Here we can pick:
- The lines of text we want on the label: Write on the line to see it on the label
- The Font: Pick from the drop-down menu which houses our selection of fonts
- The Text Size: How big the letters are
- Horizontal Alignment: (Left / Centre / Right)
- Line Spacing: The gap between lines of text
You can select from a few more options for the individual line of text by clicking on the editor at the end of the text line which brings up this menu:
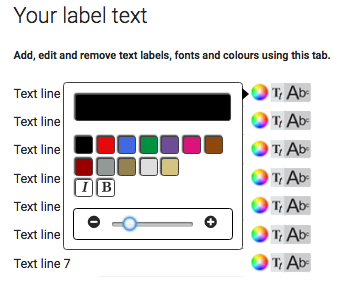
With this you can select individual options for that line of text:
- Text Colour
- Italics
- Bold
- Text Size
This is great if you’d like a heading at the top for example. You can see the changes to the label in the label preview window!
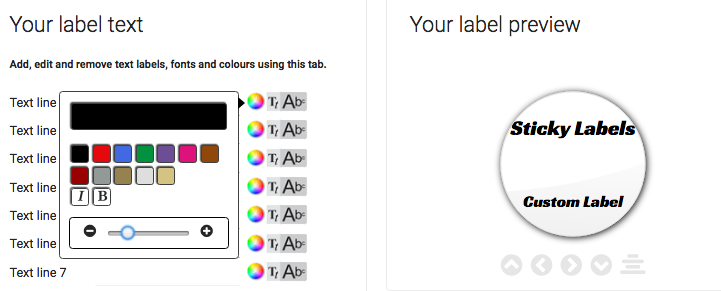
We can always pick the font and tweak the sizes etc as you go so you can make sure it looks right!
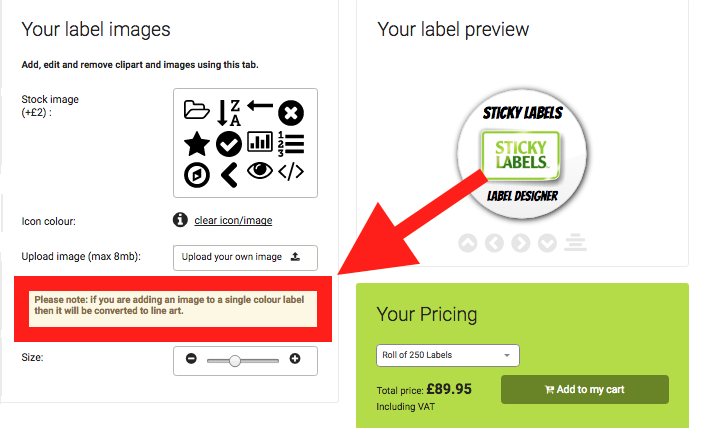
Add Custom Artwork:
Next, you can click on the “Images and Artwork” tab on the left to add your custom logos or designs:
Once there, you can upload the images and resize them or move them with the highlighted tools:
![]()
Have a play around to make sure it looks right. You may need to resize the text or perhaps expand the gaps between text but you can switch between options and tweak and change as necessary!
*NOTE*
If you picked a “single colour print” label then you will see the following notification, letting you know that the image will be converted into line art. This means it will be in plain colour without shading. So the print preview may differ from the actual print! We will try to contact you and let you know if the printed image will differ from the preview but we cannot guarantee that we spot every issue.
Buy It Now or add More Options!
At this stage, you may be complete. In which case you can choose the “Add to My Cart” option, but first you can select the number of labels you’d like printed from the drop-down menu. You can even have different amounts of labels on the roll like 250, 500 or 1000.
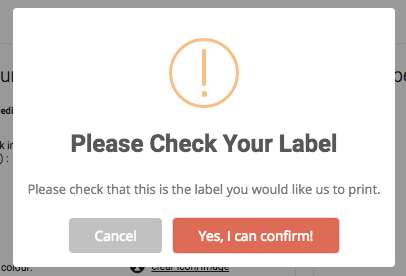
Don’t worry, we’ll give you a chance to check your label is perfect with this popup:
Now you can simply proceed to the checkout or make the last few changes. All prices are clearly displayed so you have no nasty surprises at the checkout!
Lots of Options:
I didn’t mention that you could insert a stock image at a small extra cost or add barcodes or consecutive numbering if you want to keep tracking of each label. This is just a basic example of what you can do and how you can do it.
You can always use our live chat or call is if you have any problems and we’ll be happy to help!
Remember that we include free postage and with the price you see and we print and dispatch within 2 working days of getting the order. We have a super-fast service available too if you are in a hurry.
Trust us, creating labels is easy with our label designer so why not click the link at the top of this blog post and go and have a play around. You’ll be creating labels in minutes!